cs193p – Project #3 Assignment #3 Task #10

Please note, this blog entry is from a previous course. You might want to check out the current one.

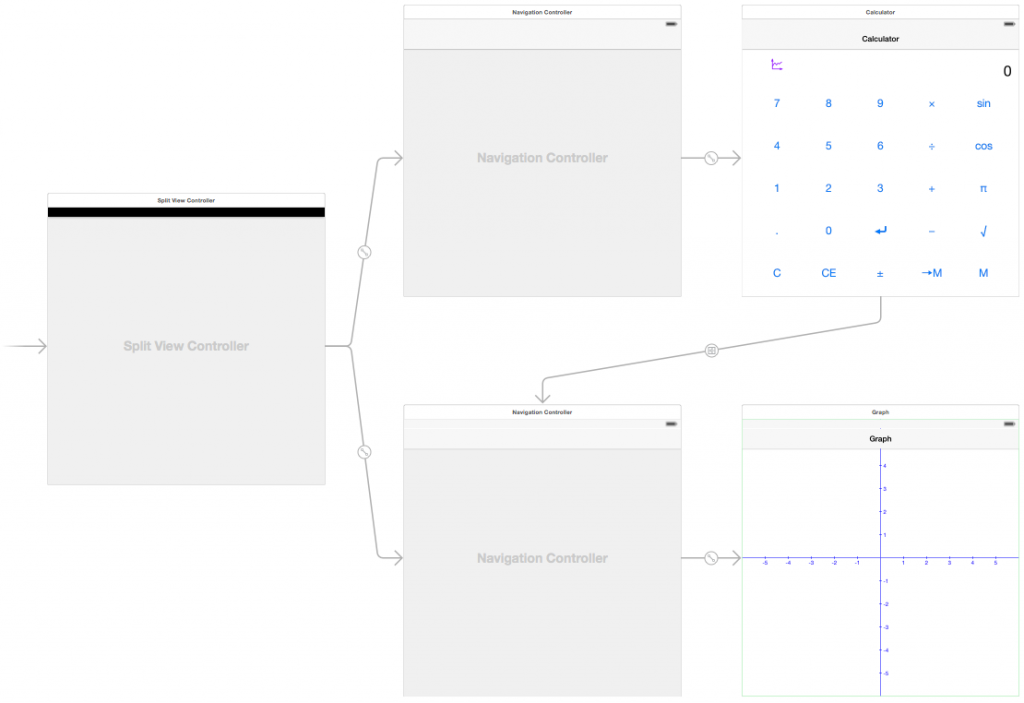
Your graphing view must be @IBDesignable and its scale must be @IBInspectable. The graphing view’s axes should appear in the storyboard at the inspected scale.

Add the respective keywords in the lines above the class and the property definitions:

@IBDesignable
class GraphView: UIView {
...
    @IBInspectable
    var scale: CGFloat = 50.0 { didSet { setNeedsDisplay() } }

… and you should see the axis in storyboard, and when inspecting the graph view see the new property scale:

cs193p - Project #3 Assignment #3 Task #10 - Live Graph View
cs193p – Project #3 Assignment #3 Task #10 – Live Graph View

The complete code for the task #10 is available on GitHub.

FacebooktwitterredditpinterestlinkedintumblrmailFacebooktwitterredditpinterestlinkedintumblrmail

cs193p – Project #3 Assignment #3 Task #9

Please note, this blog entry is from a previous course. You might want to check out the current one.

Your graphing calculator must be able to graph discontinuous functions properly (i.e. it must only draw lines to or from points which, for a given value of M, the program being graphed evaluates to a Double (i.e. not nil) that .isNormal or .isZero).

Part of this task we have already handled in the previous one, not drawing when the data source returns zero or “not normal” values. But e.g. for 1/x we still had a line from negative infinity to positive infinity. To avoid this move to new points instead of drawing lines there, when we had “impossible” previous values:
Continue reading “cs193p – Project #3 Assignment #3 Task #9”

FacebooktwitterredditpinterestlinkedintumblrmailFacebooktwitterredditpinterestlinkedintumblrmail

cs193p – Project #3 Assignment #3 Task #8

Please note, this blog entry is from a previous course. You might want to check out the current one.

The graphing view must not own (i.e. store) the data it is graphing. It must use delegation to obtain the data as it needs it.

Let’s start defining a protocol for a data source providing an y value for a given x value:

protocol GraphViewDataSource: class {
    func y(x: CGFloat) -> CGFloat?
}

Continue reading “cs193p – Project #3 Assignment #3 Task #8”

FacebooktwitterredditpinterestlinkedintumblrmailFacebooktwitterredditpinterestlinkedintumblrmail

cs193p – Project #3 Assignment #3 Task #7

Please note, this blog entry is from a previous course. You might want to check out the current one.

As part of your implementation, you are required write a generic x vs. y graphing UIView. In other words, the UIView that does the graphing should be designed in such a way that it is completely independent of the Calculator (and could be reused in some other completely different application that wanted to draw an x vs. y graph).

Download the axis-drawing helper from Stanford and add it to the project.

Create a new graph view class as subclass of UIView. For now we draw only the axis using the content scale factor of the device and the bounds of the view, and two properties to be defined below:
Continue reading “cs193p – Project #3 Assignment #3 Task #7”

FacebooktwitterredditpinterestlinkedintumblrmailFacebooktwitterredditpinterestlinkedintumblrmail

cs193p – Project #3 Assignment #3 Task #6

Please note, this blog entry is from a previous course. You might want to check out the current one.

Anytime a graph is on screen, a description of what it is being drawn should also be shown on screen somewhere sensible, e.g., if sin(M) is what is being graphed, then the string “sin(M)” should be on screen somewhere.

Prepare for the segue firing when the graph button gets pressed. For the “normal” iPhone view the destination of the segue is its designated destination view controller, for the split view it is the visible view controller of the second navigation view controller. If the destination is the graph view controller and the segue is the one originating from the graph button set the new title. To get the last part of the description of the current program, create an array of its parts and use only the last one:
Continue reading “cs193p – Project #3 Assignment #3 Task #6”

FacebooktwitterredditpinterestlinkedintumblrmailFacebooktwitterredditpinterestlinkedintumblrmail

cs193p – Project #3 Assignment #3 Task #5

Please note, this blog entry is from a previous course. You might want to check out the current one.

On iPad and in landscape on iPhone 6+ devices, the graph must be (or be able to be) on screen at the same time as your existing Calculator’s user-interface (i.e. in a split view). On other iPhones the graph should “push” onto the screen via a navigation controller.

Add a split-view controller to story board and remove the two “generic” view controllers. Make the calculator view controller the root controller of the navigation view controller and the graph view controller detail-view controller of the split view controller. As last step embed the graph view controller inside another navigation view controller, and add a title for the calculator and graph view controllers:
Continue reading “cs193p – Project #3 Assignment #3 Task #5”

FacebooktwitterredditpinterestlinkedintumblrmailFacebooktwitterredditpinterestlinkedintumblrmail

cs193p – Project #3 Assignment #3 Task #4

Please note, this blog entry is from a previous course. You might want to check out the current one.

Neither of your MVCs in this assignment is allowed to have CalculatorBrain appear anywhere in its non-private API.

For now we have only the calculator view controller, make sure to make the calculator brain private:

    private var brain = CalculatorBrain()

The complete code for the task #4 is available on GitHub.

FacebooktwitterredditpinterestlinkedintumblrmailFacebooktwitterredditpinterestlinkedintumblrmail