Please note, this blog entry is from a previous course. You might want to check out the current one.
Your application must work in both portrait and landscape orientations on both the iPhone and the iPad. Use appropriate platform-specific UI idioms (e.g. don’t let your iPad version look like a gigantic iPhone screen).
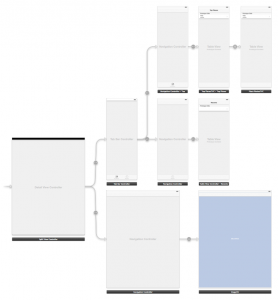
Remove everything from the iPad storyboard. Add a new split view controller, but remove all of the controllers but the split view controller itself. Go to the iPhone storyboard. Copy everything and paste it to the iPad story board. Remove both segues to the image view controller. Make the tab-bar view controller the master of the split view controller. Embed the image view controller inside a navigation view controller and make this one the detail view of the split view controller. Finally disable the animation of the activity indicator of the split view:
When a photo gets selected in the table view send that image to the image view controller:
- (void)tableView:(UITableView *)tableView
didSelectRowAtIndexPath:(NSIndexPath *)indexPath
{
    id detail = self.splitViewController.viewControllers[1];
    if ([detail isKindOfClass:[UINavigationController class]]) {
        detail = [((UINavigationController *)detail).viewControllers firstObject];
    }
    [self prepareImageVC:detail
                forPhoto:self.photos[indexPath.row]];
}
The code from task #8 which changed the zoom scale to show as much of the photo as possible while displaying no empty space is flawed in two ways. First, because the image stays on screen all time it is necessary to reset the zoom scale before adjusting the content size of the scroll view:
- (void)setImage:(UIImage *)image
{
    self.scrollView.zoomScale = 1.0;
    ...
}
Second, the height of the status bar contains in landscape mode its width, thus the code needs to be adjusted:
- (void)setZoomScaleToFillScreen
{
    ...
    double hScale = (self.scrollView.bounds.size.height
                     - self.navigationController.navigationBar.frame.size.height
                     - self.tabBarController.tabBar.frame.size.height
                     - MIN([UIApplication sharedApplication].statusBarFrame.size.height,
                           [UIApplication sharedApplication].statusBarFrame.size.width)
                     ) / self.imageView.image.size.height;
    ...
}
Finally, we need a button to reveal the master view in portrait mode. Make the image view controller the delegate for the split view:
@interface ImageVC () <..., UISplitViewControllerDelegate>
...
- (void)awakeFromNib
{
    self.splitViewController.delegate = self;
}
Hide the master view in portrait mode:
- (BOOL)splitViewController:(UISplitViewController *)svc
   shouldHideViewController:(UIViewController *)vc
              inOrientation:(UIInterfaceOrientation)orientation
{
    return UIInterfaceOrientationIsPortrait(orientation);
}
Create a button from the current title of the master view. Because the master view is inside a tab-view and a navigation view controller, search for the current view controller. (It might be necessary to set that title in storyboard, if you have not done so, yet):
- (void)splitViewController:(UISplitViewController *)svc
     willHideViewController:(UIViewController *)aViewController
          withBarButtonItem:(UIBarButtonItem *)barButtonItem
       forPopoverController:(UIPopoverController *)pc
{
    UIViewController *master = aViewController;
    if ([master isKindOfClass:[UITabBarController class]]) {
        master = ((UITabBarController *)master).selectedViewController;
    }
    if ([master isKindOfClass:[UINavigationController class]]) {
        master = ((UINavigationController *)master).topViewController;
    }
    barButtonItem.title = master.title;
    self.navigationItem.leftBarButtonItem = barButtonItem;
}
And remove that button again when in landscape mode:
- (void)splitViewController:(UISplitViewController *)svc
     willShowViewController:(UIViewController *)aViewController
  invalidatingBarButtonItem:(UIBarButtonItem *)barButtonItem
{
    self.navigationItem.leftBarButtonItem = nil;
}
The table views rotate nicely, you might want to add constraints to keep the activity indicator centered …
The complete code is available on github.
Should the line
barButtonItem.title = master.title;
not be replaced by
if (master) {
barButtonItem.title = master.title;
} else {
barButtonItem.title = @”Top Places”;
}
since we do not have a master at all time (as seen in sources)
The code you mention, is part of the splitViewController:… method. When this code gets called, there always should be a master. Of course, if you use it in other more general places, it is sensible to use introspection!
Or maybe?
if ([master isKindOfClass:[UITabBarController class]]) {
if(((UITabBarController *) master).selectedViewController) {
master = ((UITabBarController *) master).selectedViewController;
} else {
master = ((UITabBarController *) master).viewControllers[0];
}
}
You need this button only to handle the split-view controller. If you do not have a split-view controller, you do not have this particular button …
Works like a charm. However, I had no title for my back button when starting in portrait mode on iPad. This can be resolved by testing in WillHideViewController for (image == nil). If so, an alternate text can be added to the button.
Also, the text of the back button is only updated when the iPad is rotated. Not when a new place has been selected. This means the text can be incorrect. I was able to update the button in setImage. However, that seems unsatisfactory as it means iPad specific code has to be added to setImage. I could not find an alternate method. Any ideas?
... just guessing … the bar button gets its title from the master … I could be wrong, but that should be a pointer and thus have the correct value when the master changes its title … so, when you rotate the iPad, you force the view to redraw and thus get the correct title … thus a setNeedsDisplay should suffice to redraw the view and the title of the button should update …
That doesn’t work, because WillHideViewController is not called when SetNeedsDisplay is called. Thus, the title, which is set in that method, is not called. Nevertheless, adding the code to setImage seems not to cause problems on iPhone, so it’ll have to do.
In iOS 8. One can use only one storyboard for both iPhone and iPad.
There is a template called “master-detail” in the creating project window.
I rewritten this assignment to adapt this change. The good thing is that I succeed in running it in iPad simulator without using “didSelectRowAtIndexPath” and “splitViewController” methods.
But in iPhone mode, the left corner “Master” (back) button in ImageViewController (detail) is missing.
I saw carefully the Xcode’s template code “master-detail”. And I can’t figure out the reason…
I uploaded my code here
hope someone could look at it.
In iOS 8 you can use a single storyboard, that does not mean you have to. Actually if you want to support older versions you most likely want to use even more story boards.
Nevertheless, did you check that the splitViewController from your app delegate equals the self.splitViewController from your photo TVC? Is that part of code actually accessed? Should you put the code to put the button back on screen in the image view controller?
In Xcode template, the delegate of splitViewController is itself (splitViewController.delegate = itself in appDelegate). So I didn’t change it.
I remove this delegation then, add it to the ImageViewController, it doesn’t work either in iPhone mode. But it doesn’t affect the functionality in iPad mode.
I don’t understand the delegation mechanism. If I put self.splitViewController.delegate = self in ImageViewController. The latter will inform the splitViewController when it do some actions?
I don’t know how to write the code to put the back button on the left-top corner. And another thing makes me confuse is that, in IOS 8, if we add a splitViewController, we can link the Master View’s tableVIewController with the Detail View’s NavigationViewController by segue action : “show detail”.
So If it’s a segue mechanism, we don’t need to add the back button by hand I suppose.
Did you have a look at the code from the course (it’s iOS 7 though). There we nave not used the template but created the buttons, etc manually …
I test your code. In iPad mode, the back button doesn’t appear on the navigation bar.
This is the part in your code to add the back button:
I think you want to locate the “top places” tab or “recent” tab by:
if ([master isKindOfClass:[UITabBarController class]]) {
master = ((UITabBarController *)master).selectedViewController;
}
And then locate the TabViewController at the top front:
if ([master isKindOfClass:[UINavigationController class]]) {
master = ((UINavigationController *)master).topViewController;
}
barButtonItem.title = master.title;
self.navigationItem.leftBarButtonItem = barButtonItem;
But you just made thing complicated. In fact you could delete these:
if ([master isKindOfClass:[UITabBarController class]]) {
master = ((UITabBarController *)master).selectedViewController;
}
if ([master isKindOfClass:[UINavigationController class]]) {
master = ((UINavigationController *)master).topViewController;
}
then add a title to the Master TabViewController
Did you try the code from the lecture, my code should be copy of that one?
I tried the lecture code, it works. Your code is not exactly that one.
Because you added two IFs in willHideViewController. With these, the back button doesn’t appear.
So I just delete them, then add a title to the TabBarViewController. That works!
perfect 😉